【C#/WPF実践入門編(12)】MVVMパターン/アーキテクチャの基礎④ ~データテンプレートとコンテンツコントロールで実現する宣言的なView-ViewModel紐付け~
WPF編です。前回は複数のViewModelで1つのModelを共有する方法を学びました。
今回、データテンプレート(DataTemplate)とコンテンツコントロール(ContentControl)を使い、ViewとViewModelの紐付けを簡潔に行う方法を学びます。
以下のような方に役立つ内容となっています。
- ViewとViewModelの紐付けを自動化したい
- データテンプレート/コンテンツコントロールの使い方を実践的に学びたい
- ViewModelの階層構造に応じて自動的にViewを表示させたい
- より宣言的で保守性の高いMVVMコードを書きたい
この記事では、前回作成したカウンターアプリをベースに、データテンプレートとコンテンツコントロールを導入します。
そして、ViewModelの構造を定義するだけで自動的に適切なViewが割り当てられる仕組みを実装します。
MVVM解説の記事①~③から続けて見ていただくと、理解が深まるかと思います。


今回学ぶデータテンプレートは、WPFの強力な機能の1つです。これを使いこなすことで、MVVMアプリがぐっと洗練されます!
演習のコード一式はGitHubに置いてあります。
動画も作成しています。
講義:データテンプレートとコンテンツコントロールによる宣言的なView-ViewModel紐付け
前回のコードの課題
前回作成したアプリでは、App.xaml.csで以下のように手動でViewModelとViewを紐付けていました。
protected override void OnStartup(StartupEventArgs e)
{
    base.OnStartup(e);

    var storage = new JsonCounterStorage();
    var model = new CounterModel();

    var counterViewModel = new CounterViewModel(model, storage);
    var evenOddViewModel = new EvenOddViewModel(model);

    var mainWindow = new MainWindow();
    mainWindow.CounterView.SetViewModel(counterViewModel);  // ★手動で紐付け
    mainWindow.EvenOddView.SetViewModel(evenOddViewModel);  // ★手動で紐付け

    mainWindow.Show();
}この方法ですと、ViewやViewModelの数が増えて複雑な階層構造になったときに、紐づけのための記述が増え、コードが可読性が低下します。
これを解決するため、データテンプレートとコンテンツコントロールを使います。
データテンプレートとコンテンツコントロール
データテンプレートは、「このデータ型(ViewModel)が来たら、このView(XAML)で表示する」というルールを定義する機能です。
コンテンツコントロールは、コンテンツを表示するコントロールで、データテンプレートと組み合わせることで、ViewModelの型に応じて自動的に適切なViewを表示できます。
この2つを組み合わせると、以下のような仕組みが実現できます。ViewModelとViewの対応付けルールを定義(例えば、App.xaml内で定義)します。
...
<DataTemplate DataType="{x:Type vm:CounterViewModel}">
    <views:CounterView/>
</DataTemplate>
...そして、コンテンツコントロールを配置してそこへViewModelのインスタンスをバインディングすると、ViewModelの型に対応するViewが自動で配置・表示されます。
...
<ContentControl Content="{Binding CounterViewModel}"/>
...
この場合、CounterViewModelのインスタンスがCounterViewModelプロパティへバインドされると、CounterViewが自動的に表示されます。
紐づけの流れを少し整理してみましょう!
- データテンプレートを定義
「このViewModelの型には、このViewを使う」というルールを登録 - コンテンツコントロールにViewModelをバインド
ContentControlのContentプロパティにViewModelをバインド - WPFが自動的にViewを選択
WPFが型を見て、適切なデータテンプレートを探し、対応するViewを表示
この仕組みにより、ViewModelの構造を定義するだけで、自動的に適切なViewが割り当てられるようになります。
ViewModelの階層構造とViewの自動割り当て
データテンプレートの真価は、ViewModelの階層構造を扱う場合に発揮されます。簡単な例で見てみましょう。
ViewModelの階層構造を次のように定義します。このコードでは、RootViewModel → ChildViewModel → GrandChildViewModelという3階層の構造を定義しています。
namespace WpfApp1
{
    // ViewModelの階層構造
    public class RootViewModel
    {
        public ChildViewModel Child { get; }

        public RootViewModel(ChildViewModel child)
        {
            Child = child;
        }
    }

    public class ChildViewModel
    {
        public GrandChildViewModel GrandChild { get; }

        public ChildViewModel(GrandChildViewModel grandChild)
        {
            GrandChild = grandChild;
        }
    }

    public class GrandChildViewModel
    {
        public string Message { get; }

        public GrandChildViewModel(string message)
        {
            Message = message;
        }
    }
}
App.xamlで「<Application.Resources>」の内部にデータテンプレートを定義します。
(あわせてView定義についても直接記述しています)
<Application x:Class="WpfApp1.App"
             xmlns="http://schemas.microsoft.com/winfx/2006/xaml/presentation"
             xmlns:x="http://schemas.microsoft.com/winfx/2006/xaml"
             xmlns:vm="clr-namespace:WpfApp1">
    <Application.Resources>
        <!-- RootViewModelのビュー -->
        <DataTemplate DataType="{x:Type vm:RootViewModel}">
            <Border BorderBrush="Red" BorderThickness="2" Padding="10">
                <StackPanel>
                    <TextBlock Text="Root View" FontWeight="Bold"/>
                    <ContentControl Content="{Binding Child}"/>
                </StackPanel>
            </Border>
        </DataTemplate>

        <!-- ChildViewModelのビュー -->
        <DataTemplate DataType="{x:Type vm:ChildViewModel}">
            <Border BorderBrush="Blue" BorderThickness="2" Padding="10" Margin="10">
                <StackPanel>
                    <TextBlock Text="Child View" FontWeight="Bold"/>
                    <ContentControl Content="{Binding GrandChild}"/>
                </StackPanel>
            </Border>
        </DataTemplate>

        <!-- GrandChildViewModelのビュー -->
        <DataTemplate DataType="{x:Type vm:GrandChildViewModel}">
            <Border BorderBrush="Green" BorderThickness="2" Padding="10" Margin="10">
                <StackPanel>
                    <TextBlock Text="GrandChild View" FontWeight="Bold"/>
                    <TextBlock Text="{Binding Message}"/>
                </StackPanel>
            </Border>
        </DataTemplate>
    </Application.Resources>
</Application>ここでは簡易のため、Viewの定義(XAML)を直接データテンプレートとして記載しています。
実際の開発では、別ファイルで定義したViewを参照することが多いです。
そして、最後にコンポジションルート(App.xaml.csのOnStartupメソッド)で、ViewModel階層を構築し、それをMainWindowに設定します。
using System.Windows;

namespace WpfApp1
{
    /// <summary>
    /// Interaction logic for App.xaml
    /// </summary>
    public partial class App : Application
    {
        protected override void OnStartup(StartupEventArgs e)
        {
            base.OnStartup(e);

            var grandChild = new GrandChildViewModel("Hello from GrandChild!");
            var child = new ChildViewModel(grandChild);
            var root = new RootViewModel(child);

            var mainWindow = new MainWindow
            {
                DataContext = root
            };
            mainWindow.Show();
        }
    }
}
これで、以下のように表示されます。
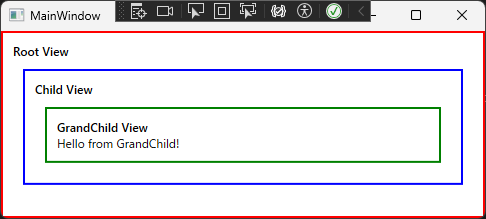
重要なポイントは、MainWindow(View)とRootViewModelの紐づけだけ行うと、WPFが自動的に以下のように展開してくれることです。
- RootViewModelを検出 → RootViewを表示
- その中のChildViewModelを検出 → ChildViewを表示
- その中のGrandChildViewModelを検出 → GrandChildViewを表示

ViewModelの階層構造(VMの木)を構築するだけで、あとは自動的に適切なViewが割り当てられるってことだね!
その通りです。この仕組みを理解すると、複雑なUIでも整理されたコードで実装できるようになります。それでは演習で実際に試してみましょう!
データテンプレートについて詳しくは、Microsoftの記事も参考にしてください。
実は、既存のコントロールについても、内部的にデータテンプレートを使っているもの(例:TreeView、ListView)が多くあります。
演習:カウンターアプリへデータテンプレート、コンテンツコントロールを導入
前回作成したカウンターアプリに、データテンプレートとコンテンツコントロールを導入して、ViewとViewModelの紐付けを自動化します。
「ViewModelの構造」+「各ViewModelとViewの対応」を用意しておくことで、画面が構築されるようにします。以下のようなイメージです。

以下の手順で前回アプリへコード追加・修正をして実装します。
- 手順1:MainView/MainViewModelを作成
- 手順2:MainWindowを修正
- 手順3:App.xamlへデータテンプレートを定義
- 手順4:App.xaml.csでコンポジションルートを修正
それでは具体的に実装してみましょう!
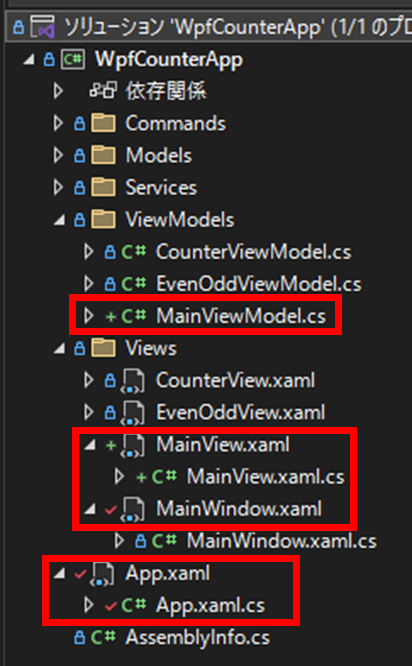
手順1:MainView/MainViewModelを作成
ViewModelsフォルダにMainViewModel.csを作成します。
namespace WpfCounterApp.ViewModels
{
    public class MainViewModel
    {
        public CounterViewModel CounterViewModel { get; }
        public EvenOddViewModel EvenOddViewModel { get; }

        public MainViewModel(CounterViewModel counterViewModel, EvenOddViewModel evenOddViewModel)
        {
            CounterViewModel = counterViewModel;
            EvenOddViewModel = evenOddViewModel;
        }
    }
}MainViewModelは、CounterViewModelとEvenOddViewModelを子として保持するシンプルな親ViewModelです。これでViewModelの階層構造ができました。
そして、Viewsフォルダに、ユーザコントロールとしてMainView.xaml(及びそのコードビハインド)を作成します。
<UserControl x:Class="WpfCounterApp.Views.MainView"
             xmlns="http://schemas.microsoft.com/winfx/2006/xaml/presentation"
             xmlns:x="http://schemas.microsoft.com/winfx/2006/xaml"
             xmlns:mc="http://schemas.openxmlformats.org/markup-compatibility/2006"
             xmlns:d="http://schemas.microsoft.com/expression/blend/2008"
             xmlns:local="clr-namespace:WpfCounterApp.Views"
             mc:Ignorable="d"
             d:DesignHeight="450" d:DesignWidth="800">
    <StackPanel Margin="20" VerticalAlignment="Center">
        <!-- ★コンテンツコントロールを使ってViewModelに対応するViewを自動表示 -->
        <ContentControl Content="{Binding CounterViewModel}" Margin="0,0,0,20"/>

        <Separator Margin="20,0" Background="LightGray" Height="1"/>

        <!-- ★コンテンツコントロールを使ってViewModelに対応するViewを自動表示 -->
        <ContentControl Content="{Binding EvenOddViewModel}" Margin="0,20,0,0"/>
    </StackPanel>
</UserControl>
ポイントは、ContentControl(コンテンツコントロール)を使ってViewModelをバインドしていることです。
ここで具体的なView(CounterViewやEvenOddView)の名前は一切書いていませんね。
MainView.xaml.csは以下のように記述します。DataContextの設定は不要です(後述のMainWindowで設定します)。
using System.Windows.Controls;

namespace WpfCounterApp.Views
{
    /// <summary>
    /// MainView.xaml の相互作用ロジック
    /// </summary>
    public partial class MainView : UserControl
    {
        public MainView()
        {
            InitializeComponent();
        }
    }
}
手順2:MainWindowを修正
MainWindow.xamlを以下のように修正します。
<Window x:Class="WpfCounterApp.Views.MainWindow"
        xmlns="http://schemas.microsoft.com/winfx/2006/xaml/presentation"
        xmlns:x="http://schemas.microsoft.com/winfx/2006/xaml"
        xmlns:d="http://schemas.microsoft.com/expression/blend/2008"
        xmlns:mc="http://schemas.openxmlformats.org/markup-compatibility/2006"
        xmlns:local="clr-namespace:WpfCounterApp"
        xmlns:views="clr-namespace:WpfCounterApp.Views"
        mc:Ignorable="d"
        Title="CounterWindow" Height="450" Width="800">
    <!-- ★コンテンツコントロールでDataContextをそのまま表示 -->
    <ContentControl Content="{Binding}"/>
</Window>
MainWindow.xamlはとてもシンプルになりました!<ContentControl Content="{Binding}"/>だけです。
これは、DataContextに設定されたViewModelの型に応じて、自動的に適切なViewが表示されるという意味です。
コードビハインドの修正は不要です。DataContextの設定はApp.xaml.csで行います。
手順3:App.xamlへデータテンプレートを定義
App.xamlの「<Application.Resources>」へ、ViewModelとViewの対応関係を定義するデータテンプレートを追加します。
<Application x:Class="WpfCounterApp.App"
             xmlns="http://schemas.microsoft.com/winfx/2006/xaml/presentation"
             xmlns:x="http://schemas.microsoft.com/winfx/2006/xaml"
             xmlns:local="clr-namespace:WpfCounterApp"
             xmlns:vm="clr-namespace:WpfCounterApp.ViewModels"
             xmlns:views="clr-namespace:WpfCounterApp.Views">
    <Application.Resources>
        <!-- ★データテンプレートでViewModelとViewを紐付け -->
        <DataTemplate DataType="{x:Type vm:MainViewModel}">
            <views:MainView/>
        </DataTemplate>

        <DataTemplate DataType="{x:Type vm:CounterViewModel}">
            <views:CounterView/>
        </DataTemplate>

        <DataTemplate DataType="{x:Type vm:EvenOddViewModel}">
            <views:EvenOddView/>
        </DataTemplate>
    </Application.Resources>
</Application>
以下がポイントです。
DataType属性で対象のViewModel型を指定- データテンプレートの中身には、対応するViewを配置
- これらのデータテンプレートはアプリ全体で有効
(Application.Resourcesに定義しているため。Window/UserControl.Resourcesを使い適用スコープを絞ることも可能)
リソースは、アプリ全体で共通して使える「部品」や「設定」の保管場所です。
リソース全般の仕組みや使い方については、Microsoftの記事も参考にしてください。
手順4:App.xaml.csでコンポジションルートを修正
App.xaml.csを以下のように修正します。
using System.Windows;
using WpfCounterApp.Models;
using WpfCounterApp.Services;
using WpfCounterApp.ViewModels;
using WpfCounterApp.Views;

namespace WpfCounterApp
{
    /// <summary>
    /// Interaction logic for App.xaml
    /// </summary>
    public partial class App : Application
    {
        protected override void OnStartup(StartupEventArgs e)
        {
            base.OnStartup(e);

            // サービスを作成
            var storage = new JsonCounterStorage();

            // Modelを作成
            var model = new CounterModel();

            // ViewModelを作成(依存性注入)
            var counterViewModel = new CounterViewModel(model, storage);
            var evenOddViewModel = new EvenOddViewModel(model);

            // ★MainViewModelを作成(ViewModelの階層構造を構築)
            var mainViewModel = new MainViewModel(counterViewModel, evenOddViewModel);

            // ★MainWindowを作成し、MainViewModelをDataContextに設定
            var mainWindow = new MainWindow
            {
                DataContext = mainViewModel
            };

            // ウィンドウを表示
            mainWindow.Show();
        }
    }
}
前回と比べて以下の変更点があります。
- MainViewModelを作成:ViewModelの階層構造(親子関係)を構築
- MainWindowのDataContextに設定:MainViewModelを設定するだけで、あとはWPFが自動的にViewを展開
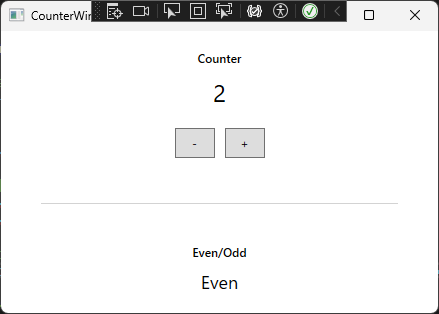
アプリを実行
アプリを実行すると、前回と同じように動作します。(動作は変わりません)
コードの構造は大きく変わり、「ViewModelの構造」+「各ViewModelとViewの対応」を用意しておくことで、画面が構築されるようになっています。
それぞれのView・ViewModelごとに手動で紐付けするっていうコードが不要になったんだね!
ViewとViewModelを“直接結ばずに”、型(クラスの種類)だけで自動的に対応づけている、というのがこのアイディアの核心ですね。
これにより、ViewとViewModelを疎結合にすることができ、部品ととしての再利用性も向上しますね。
まとめ
本記事では、MVVMパターンにおけるデータテンプレートとコンテンツコントロールを使った宣言的なView-ViewModel紐付けについて学びました。
重要なポイントは以下の通りです。
- データテンプレート(DataTemplate):ViewModelの型とViewの対応関係を定義する
- コンテンツコントロール(ContentControl):ViewModelを表示する際に、データテンプレートを使って自動的に適切なViewを選択
- ViewModelの階層構造:親子関係のあるViewModelを定義することで、自動的にViewも階層的に展開される
- 宣言的な紐付け:コード上で手動で紐付けるのではなく、XAMLで宣言的にルールを定義
これにより、「ViewModelの論理構造」・「ViewModelと各Viewの対応関係」といった関心事がきれいに分離され、コードが見やすくなりました。
次回は、実務のアプリ開発で重要となる「CommunityToolkit.Mvvm」の使い方を紹介する予定です。
CommunityToolkit.Mvvmを使うことで、WPF・MVVMアプリにおける定型的なコード(ボイラープレート)を省略できるようになり、コードの可読性が大幅に向上します。
引き続き、一緒にC# WPFアプリ開発を学んでいきましょう!