【Dify x C#連携②】 C#からDify APIを呼び出す方法 ~HttpClient・BlazorでAIチャット実装~【C#実践アプリ開発ラボ】
アプリ開発ラボ編です。今回は、前回作成したDifyアプリをC#から呼び出す方法を紹介します。
前回はDify CloudでAIチャットボットを作成し、Web公開までを行いました。今回は、そのDifyアプリをバックエンドAPIとして、C#アプリから連携する方法を解説します。
以下のような方に役立つ内容となっています。
- DifyをバックエンドAPIとして活用したい方
- C#アプリにAI機能を組み込みたい方
本記事では、Shell(例:PowerShell)での動作確認から始めて、C#コンソールアプリ、そして実用的なBlazorアプリまで、段階的にDify API連携を実装していきます。

DifyのAPI連携は非常にシンプルです。RESTful APIなので、C#の標準ライブラリだけで簡単に呼び出せます!
基本的な考え方は、C#以外のアプリから連携する場合でも同じです。
記事で作ったコードはGitHubでも公開しています。
動画も作成しています。
Dify APIとは?
Difyアプリは、以下のようにチャットアプリ公開とバックエンドサービスAPIという2つの使い方ができます。
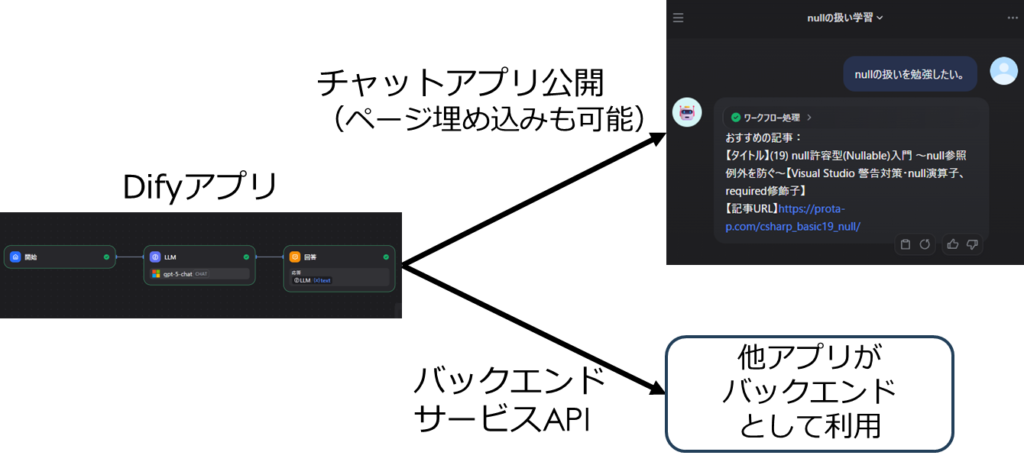
前回はブログ用チャットボットで「チャットアプリ公開」を行いました。今回、同じブログ用チャットボットについて、APIを使ってAIアプリを作ります。
Difyの基本やDifyアプリの作り方については前回の記事を参考にしてください。

APIを使うと、例えば以下のようなシステムを作ることが可能になります。
(例1)業務システムに“自然に溶け込む” AIアシスト機能
画面右下にチャットUIを置くのではなく、「この画面の入力内容を要約」「この一覧の選択行から文章生成」など、アプリ内の操作と密接に連動したAI機能を作れます。
埋め込みチャットでは画面連携が弱いため、API連携で真価が出る領域ですね。
(例2)バックエンド処理に AI を組み込む
定期バッチやバックグラウンドサービスから Dify API を呼び出し、レポート生成・文章校正・通知メッセージ生成などを自動化できます。
以下の3ステップで実際にDifyのAPIを使ってみましょう
- STEP1:シェルで動作確認
- STEP2:C#コンソールアプリから呼び出し
- STEP3:C#Blazorでチャット画面を作る
慣れないうちは、このように単純なものから段階的に試してみることをおすすめします。
技術検証を段階的に積み上げていくので、トラブルが発生したときに問題の切り分けもしやすく、安心です。
STEP1:シェルで動作確認
APIキー作成
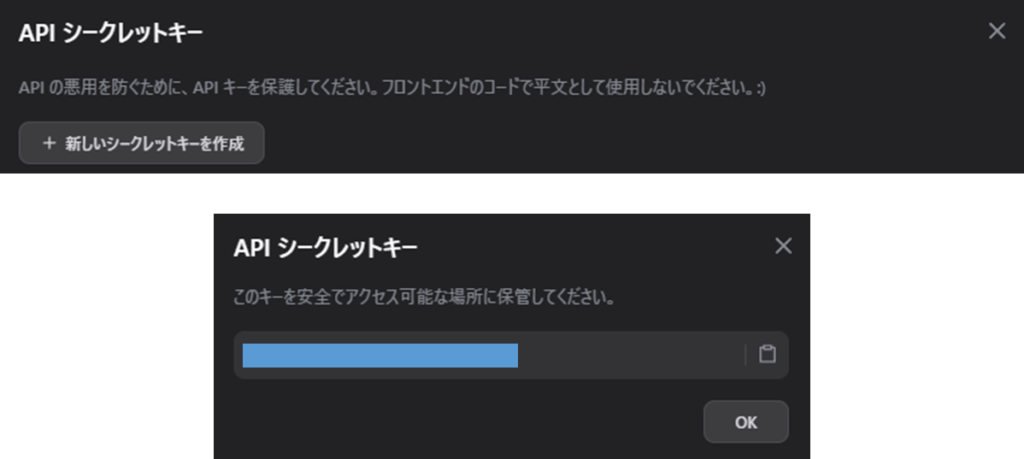
最初に、Difyアプリの管理画面で、APIキーを取得します。作ったアプリ画面の左メニューで「APIアクセス」を選び、そのあとに右上の「APIキー」を選択しましょう。
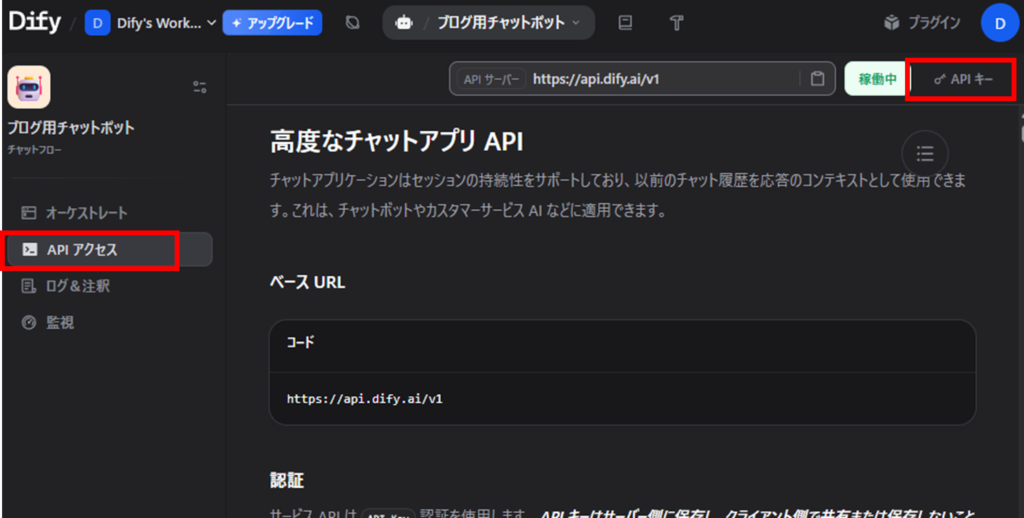
以下の画面になるので、APIシークレットキーを作成しましょう。作成したキー「app-xxx…xxx」をメモしておきましょう。
Shellで確認
ShellからAPIを呼び出す方法については、さきほどの「APIアクセス」のページに詳しい説明があるので、それを参考にしましょう。ShellでAPIを呼び出す具体例も載っています。
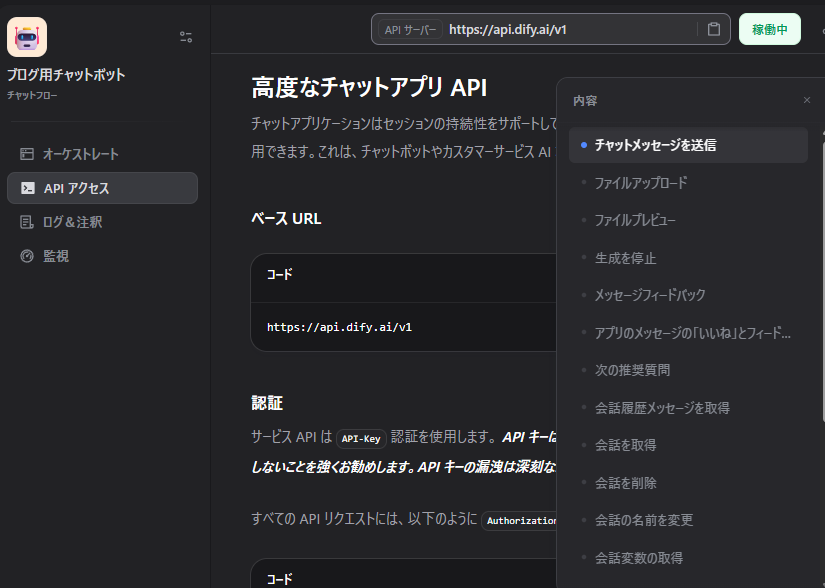
会話形式のチャットメッセージ送信とその回答取得ができる「/chat-messages」というエンドポイントを使ってみましょう。
今回、PowerShellでInvoke-RestMethodを使って実行してみます。以下のように実行してみましょう。(curlコマンド、Postmanといったツールを使う方法もあります。)
$apiKey="【APIキー】"
Invoke-RestMethod `
    -Uri "https://api.dify.ai/v1/chat-messages" `
    -Method POST `
    -Headers @{ Authorization = "Bearer $apiKey" } `
    -ContentType "application/json" `
    -Body (@{
        inputs = @{}
        query = "DateTime型の使い方を知りたいです"
        response_mode = "blocking"
        user = "abc-123"
} | ConvertTo-Json)- inputs = @{}
→ Difyアプリ側で使う追加パラメータ(今回は特になし) - query = “DateTime型の使い方を知りたいです”
→ AIに聞きたいメッセージ(質問内容) - response_mode = “blocking”
→ 「AIの返答が完了するまで待って、結果を一気に受け取る」モード - user = “abc-123”
→ ユーザ識別用のIDで、誰の会話かをDifyに区別させるためのもの
以下のような実行結果が得られれば成功です。
event           : message
task_id         : 22da2c0d-b7d1-4034-807e-75abba059c16
id              : 28b50cff-8d09-487f-85d3-9668491bd14a
message_id      : 28b50cff-8d09-487f-85d3-9668491bd14a
conversation_id : bbb2dbb6-0d77-48cc-82fe-80720bb7d70a
mode            : advanced-chat
answer          : おすすめの記事:
                  【タイトル】(21) 日時マスターガイド~DateTime/DateTimeOffset/TimeProviderまで~【サマータイムの正確な扱い】
                  【記事URL】https://prota-p.com/csharp_basic21_datetime/
metadata        : @{annotation_reply=; retriever_resources=System.Object[]; usage=}
created_at      : 1762577988
「answer」にAIの回答が格納されているね!
実際にはJSON形式でこれらが格納されています。これでAPI疎通確認ができたので、次にC#アプリからAPI呼び出しをしてみましょう!
STEP2:C#コンソールアプリからAPI呼び出し
プロジェクト作成とコード実装
Visual StudioでC#のコンソールアプリプロジェクト(トップレベルステートメント)を作成して、Program.csで次のようなコードを書きます。
C#の基本やVisual Studioの使い方については、C#プログラミングの基礎を参考にしてください。

using System.Net.Http.Json;
using System.Text.Json.Serialization;

// 環境変数からAPIキーを取得(未設定時は例外)
var apiKey = Environment.GetEnvironmentVariable("DIFY_API_KEY")
    ?? throw new InvalidOperationException("環境変数 DIFY_API_KEY が設定されていません");

const string apiUrl = "https://api.dify.ai/v1/chat-messages";

using var httpClient = new HttpClient();
httpClient.DefaultRequestHeaders.Add("Authorization", $"Bearer {apiKey}");

// 会話IDを保持して文脈を継続
string? conversationId = null;

while (true)
{
    Console.Write("\nあなた: ");
    var input = Console.ReadLine();
    if (string.IsNullOrWhiteSpace(input)) break;

    var request = new DifyRequest
    {
        Query = input,
        ConversationId = conversationId,
        User = "console-user"
    };

    // JSON自動変換でリクエスト送信・レスポンス受信
    var response = await httpClient.PostAsJsonAsync(apiUrl, request);
    var result = await response.Content.ReadFromJsonAsync<DifyResponse>();

    conversationId = result?.ConversationId;
    Console.WriteLine($"\nAI: {result?.Answer}");
}

// リクエスト用データ定義
record DifyRequest
{
    [JsonPropertyName("inputs")]
    public object Inputs { get; init; } = new { };

    [JsonPropertyName("query")]
    public required string Query { get; init; }

    [JsonPropertyName("response_mode")]
    public string ResponseMode { get; init; } = "blocking";

    [JsonPropertyName("conversation_id")]
    public string? ConversationId { get; init; }

    [JsonPropertyName("user")]
    public required string User { get; init; }
}

// レスポンス用データ定義
record DifyResponse
{
    [JsonPropertyName("conversation_id")]
    public string? ConversationId { get; init; }

    [JsonPropertyName("answer")]
    public string? Answer { get; init; }
}
ポイントは以下です。
- 環境変数からAPIキーを安全に取得 – ソースコードにAPIキーを書かず、
Environment.GetEnvironmentVariable()で読み込み - HttpClientでJSON送受信を自動化 –
PostAsJsonAsync()とReadFromJsonAsync()でシリアライズ・デシリアライズを簡潔に記述
会話コンテキストの保持は、現状の一問一答チャットボットでは不要なのですが、今後の機能拡張で活用することが可能です。
ユーザIDは現状で固定値ですが、認証機能と併せてログインユーザごとに値を設定し、Difyアプリ側でユーザごとの処理を行うことも可能です。
アプリを実行
デバッグ実行のときはVisual Studioの「デバッグ>デバッグのプロパティ」で環境変数DIFY_API_KEYの値を設定しておきましょう。
デバッグ時の環境変数の設定方法は以下の記事の環境変数設定を参考にしてください。

実行すると以下のようにコンソールで会話ができます。
あなた: 日時型の扱いを知りたい。

AI: おすすめの記事:
【タイトル】(21) 日時マスターガイド~DateTime/DateTimeOffset/TimeProviderまで~【サマータイムの正確な扱い】
【記事URL】https://prota-p.com/csharp_basic21_datetime/

あなた: HelloWorldアプリをまず作りたい

AI: おすすめの記事:
【タイトル】(1) Visual Studioで開発 ~HTMLでHello World~
【記事URL】https://prota-p.com/csharp_basic1_helloworld/C#アプリからAPIで呼び出せるようになったね!
これを土台に、次はC# BlazorでWebアプリ化してみましょう!
STEP3:C#Blazorでチャット画面を作る
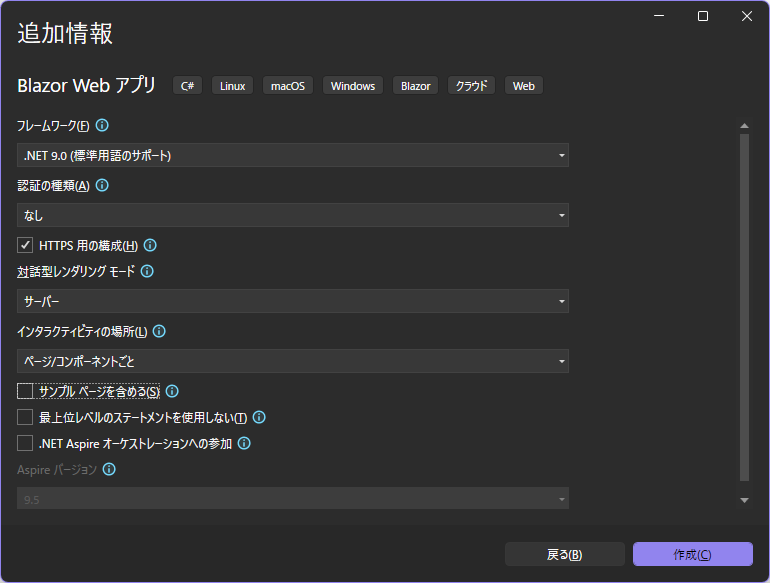
Visual StudioでBlazor Webアプリのプロジェクトを新規作成します。
Blazorアプリ実践入門編も参考にしてください。
プロジェクト作成とコード実装
以下のように認証なし、サンプルページなしの簡易なサーバモードで作ります。
作成したプロジェクトをベースに以下を修正・作成します。(全コードはこちらにあるので参考にしてください)
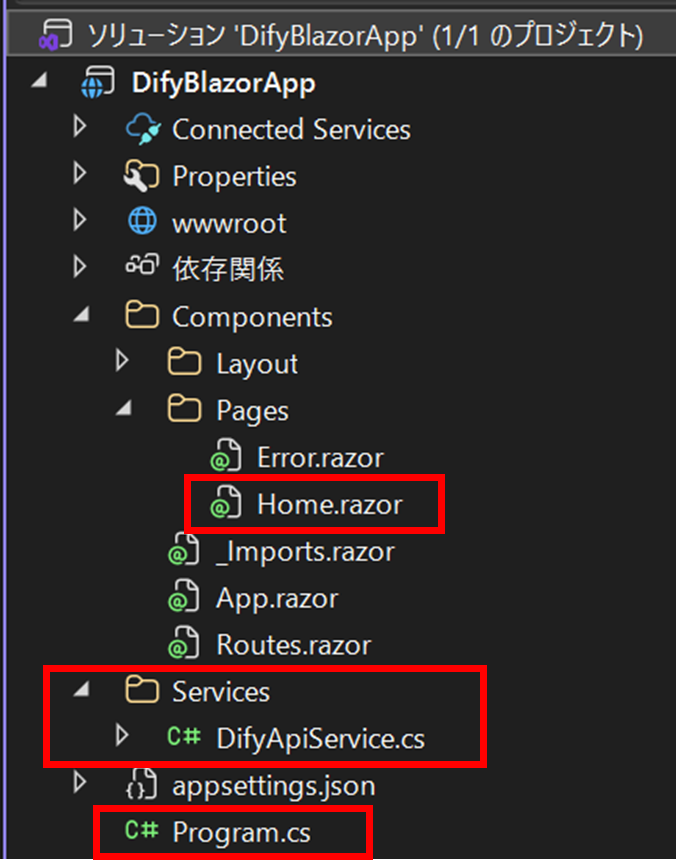
それぞれ要点を説明します。
Home.razor
Razorでチャット画面をつくります。
@page "/"
@rendermode InteractiveServer
@using DifyBlazorApp.Services
@inject DifyApiService DifyApi

<PageTitle>Dify Chat</PageTitle>

<div class="chat-container">
    <h3>AI チャット</h3>

    <div class="messages-area">
        @* メッセージリストの動的レンダリング *@
        @foreach (var message in _messages)
        {
            <div class="message @(message.IsUser ? "user-message" : "ai-message")">
                <div class="message-header">
                    @(message.IsUser ? "👤 あなた" : "🤖 AI")
                </div>
                <div class="message-body">
                    @message.Text
                </div>
            </div>
        }
        @* 処理中インジケーター *@
        @if (_isProcessing)
        {
            <div class="message ai-message">
                <div class="message-header">🤖 AI</div>
                <div class="message-body">
                    <span class="typing-indicator">考え中...</span>
                </div>
            </div>
        }
    </div>

    <div class="input-area">
        @* 双方向バインディング: oninput イベントでリアルタイム更新 *@
        <input @bind="_inputText"
               @bind:event="oninput"
               @onkeydown="HandleKeyDown"
               placeholder="メッセージを入力..."
               disabled="@_isProcessing"
               class="message-input" />
        @* 計算プロパティによる disabled 状態の制御 *@
        <button @onclick="SendMessage"
                disabled="@IsSendDisabled"
                class="send-button">
            送信
        </button>
    </div>
</div>

@code {
    private List<ChatMessage> _messages = new();
    private string _inputText = string.Empty;
    private bool _isProcessing = false;
    private string? _conversationId = null; // 会話の継続性を保持

    // ユーザー識別子(今回は固定値)
    private const string UserId = "blazor-user";

    // 計算プロパティ: 送信ボタンの有効/無効を判定
    private bool IsSendDisabled => _isProcessing || string.IsNullOrWhiteSpace(_inputText);

    private async Task SendMessage()
    {
        if (string.IsNullOrWhiteSpace(_inputText) || _isProcessing)
            return;

        var userMessage = _inputText;
        _messages.Add(new ChatMessage { Text = userMessage, IsUser = true });
        _inputText = string.Empty;
        _isProcessing = true;

        try
        {
            // 外部 API 呼び出し(依存性注入されたサービス利用)
            var response = await DifyApi.SendMessageAsync(
                userMessage,
                _conversationId,
                UserId);

            // 会話 ID を保持して会話の継続性を維持
            _conversationId = response?.ConversationId;

            if (!string.IsNullOrEmpty(response?.Answer))
            {
                _messages.Add(new ChatMessage
                {
                    Text = response.Answer,
                    IsUser = false
                });
            }
        }
        catch (Exception ex)
        {
            _messages.Add(new ChatMessage
            {
                Text = $"エラーが発生しました: {ex.Message}",
                IsUser = false
            });
        }
        finally
        {
            _isProcessing = false;
        }
    }

    // キーボードイベントハンドリング: Enter キーで送信
    private async Task HandleKeyDown(KeyboardEventArgs e)
    {
        if (e.Key == "Enter" && !e.ShiftKey)
        {
            await SendMessage();
        }
    }

    // ネストクラス: required プロパティによる初期化の強制
    private class ChatMessage
    {
        public required string Text { get; init; }
        public required bool IsUser { get; init; }
    }
}
DifyApiService.cs
DifyのAPI呼び出しを行うサービスクラスです。コンソールアプリで作っていたものをクラス化したものです。(APIキーは環境変数から読み込みます)
using System.Text.Json.Serialization;

namespace DifyBlazorApp.Services
{
    public class DifyApiService
    {
        private readonly HttpClient _httpClient;
        private readonly string _apiKey;
        private const string ApiUrl = "https://api.dify.ai/v1/chat-messages";

        public DifyApiService(HttpClient httpClient)
        {
            _httpClient = httpClient;

            _apiKey = Environment.GetEnvironmentVariable("DIFY_API_KEY")
                ?? throw new InvalidOperationException("環境変数 DIFY_API_KEY が設定されていません");

            _httpClient.DefaultRequestHeaders.Add("Authorization", $"Bearer {_apiKey}");
        }

        public async Task<DifyResponse?> SendMessageAsync(
            string query,
            string? conversationId,
            string userId)
        {
            var request = new DifyRequest
            {
                Query = query,
                ConversationId = conversationId,
                User = userId
            };

            var response = await _httpClient.PostAsJsonAsync(ApiUrl, request);
            response.EnsureSuccessStatusCode();

            return await response.Content.ReadFromJsonAsync<DifyResponse>();
        }
    }

    // リクエスト用データ定義
    public record DifyRequest
    {
        [JsonPropertyName("inputs")]
        public object Inputs { get; init; } = new { };

        [JsonPropertyName("query")]
        public required string Query { get; init; }

        [JsonPropertyName("response_mode")]
        public string ResponseMode { get; init; } = "blocking";

        [JsonPropertyName("conversation_id")]
        public string? ConversationId { get; init; }

        [JsonPropertyName("user")]
        public required string User { get; init; }
    }

    // レスポンス用データ定義
    public record DifyResponse
    {
        [JsonPropertyName("conversation_id")]
        public string? ConversationId { get; init; }

        [JsonPropertyName("answer")]
        public string? Answer { get; init; }
    }
}
Program.cs
以下のようにHttpClientとDifyApiServiceの登録するコード「builder.Services.AddHttpClient();」を追加します。
using DifyBlazorApp.Components;
using DifyBlazorApp.Services;

var builder = WebApplication.CreateBuilder(args);

// Add services to the container.
builder.Services.AddRazorComponents()
    .AddInteractiveServerComponents();

// HttpClient と DifyApiService の登録
builder.Services.AddHttpClient<DifyApiService>();

var app = builder.Build();

// Configure the HTTP request pipeline.
if (!app.Environment.IsDevelopment())
{
    app.UseExceptionHandler("/Error", createScopeForErrors: true);
    // The default HSTS value is 30 days. You may want to change this for production scenarios, see https://aka.ms/aspnetcore-hsts.
    app.UseHsts();
}

app.UseHttpsRedirection();


app.UseAntiforgery();

app.MapStaticAssets();
app.MapRazorComponents<App>()
    .AddInteractiveServerRenderMode();

app.Run();
AddHttpClientは「DifyAppService」と「DifyAppServiceで使うHttpClient」を同時にDIコンテナへ登録してくれます。
アプリを実行
アプリを実行してみましょう。以下のように動作します。
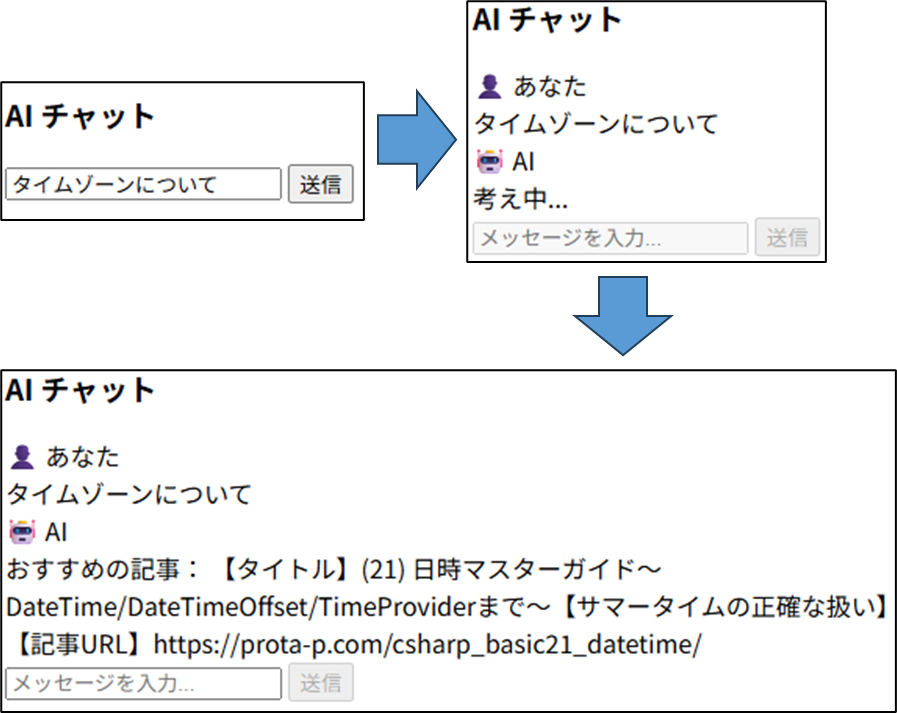
(UIがちょっと寂しいけど…)
Difyがバックエンドで動作する自前のWebアプリが完成したね!

まあ、UIは少し頑張れば、以下のように変えられます。
(Bootstrapを使っています)
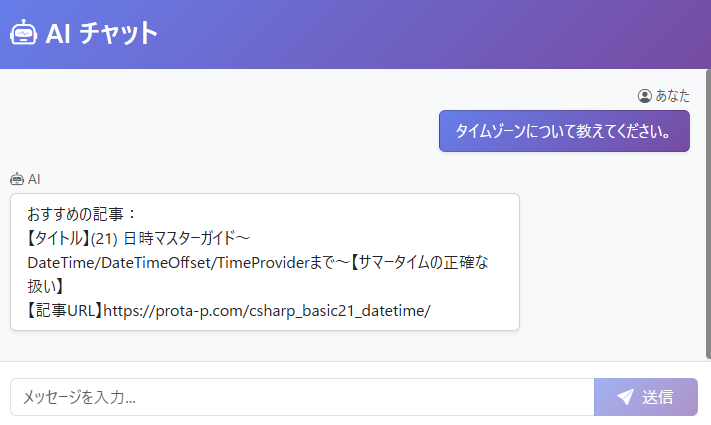
これをベースにして、UIを好きなデザインにしたり、画面入力を工夫したりと自由の高いカスタマイズが可能になりますね!
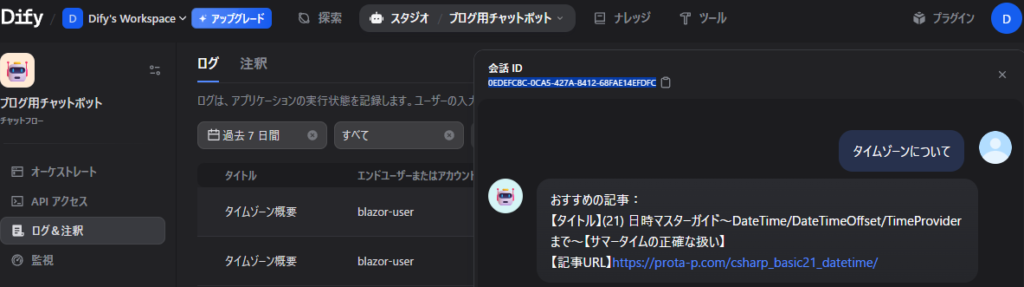
ちなみに、Difyアプリ側の左メニュー「ログ&注釈」で、APIで問い合わせた内容の履歴を確認できます。デバッグなどに使うとよいでしょう。
また、開発したWebアプリをサーバへデプロイして公開したいという場合は、以下を参考にしてください。

まとめ
本記事では、DifyアプリをバックエンドAPIとして活用し、C#アプリから連携する方法を段階的に解説しました。
Dify APIを使うことで、チャット画面の埋め込みだけでなく、以下のようなものを実現できます。
- 業務システムに自然に溶け込むAIアシスト機能
- バックグラウンド処理でのAI活用(レポート生成、文章校正など)
実装は3つのステップで進めました。
- STEP1:Shell(PowerShell)でAPIの疎通確認
- STEP2:C#コンソールアプリで基本的な呼び出し
- STEP3:Blazor WebアプリでチャットUI
段階的に検証することで、トラブル発生時の問題切り分けが容易になります。
技術的には、C#のHttpClientとPostAsJsonAsync()、ReadFromJsonAsync()を使うことで、JSON送受信を簡潔に記述できます。
このベースを活かせば、UIを自由にカスタマイズしたり、ユーザ認証と組み合わせたりと、様々な実用的なアプリへ発展させることができます。
引き続き、DifyやC#の連携について一緒に学んでいきましょう!